This website, bartwolff.com, is served by Sloeber, a less than impressive “server” located in my house which actually does an excellent job with the virtually non-existent traffic I get. There are two reasons why I host my site this way: because I like having full control over my server and because decent ASP.NET hosting is a pain to get around here.
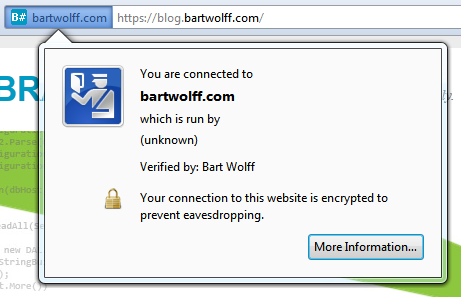
Anyway, I’ve recently added the option of visiting my site securely through HTTPS, which is good because it means Russian hackers can no longer pwn my webapp whenever I log in to my blog from a remote location. You can also try it if you want by just going to https://blog.bartwolff.com/ and accepting the invalid certificate you’ll most likely get warned about.
In the remainder of this post, I’ll go over the steps I’ve gone through, which have involved a lot of Googling as most of them were completely new to me and not always very intuitive.
Step 1: root CA certificate creation
I use certificates in at least three different places: this website, Sloeber’s RDP connection, and my SVN server. It therefore would make sense to use a single root certificate to sign these three certificates. In this way, I only need to add the root certificate to my list of trusted certificate authorities in order to trust the three child certificates (and any other certificates which might arrive in the future). The first step is therefore to create my own mini “certificate authority”.
I use OpenSSL for all the certificate work. By sheer dumb luck, I already had OpenSSL lying around as part of my msysgit installation, and could talk to it through the Git Bash. I start by generating a new RSA key to be used by the CA:
openssl genrsa -aes256 -out ca.key 8192
After entering a password which is a genuine pain in the ass, I move on to actually creating the root CA certificate using this key:
openssl req -new -x509 -days 7300 -key ca.key -out ca.crt
The certificate is valid for 20 years. I enter the following information which will become part of the certificate:
Country Name (2 letter code) [AU]:NL
State or Province Name (full name) [Some-State]:Netherlands
Locality Name (eg, city) []:Netherlands
Organization Name (eg, company) [Internet Widgits Pty Ltd]:Bart Wolff
Organizational Unit Name (eg, section) []:Certificate Authority
Common Name (eg, YOUR name) []:bartwolff.com
Email Address []:info@bartwolff.com
The only part which is really important is the common name (CN), which should match the domain you’re going to use the certificate on. Of course, for this root CA certificate even that doesn’t really matter as the certificate itself will only ever be used to sign other certificates. The root CA certificate has now been created.
Step 2: root CA certificate importing
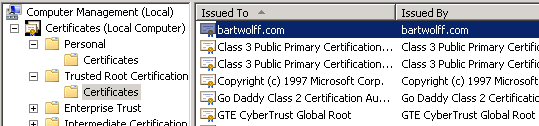
The root CA certificate will be used to delegate trust to any certificates signed by it. However, this still leaves trusting the root CA certificate itself. To do this, I need to import it in various places. The first place is the Windows certificate store on the computers that I own, like my laptop and my server, Sloeber. To do this I open the Certificates snap-in in the Microsoft Management Console for the local computer. Here, I import the ca.crt file that I just created into the Trusted Root Certification Authorities folder.
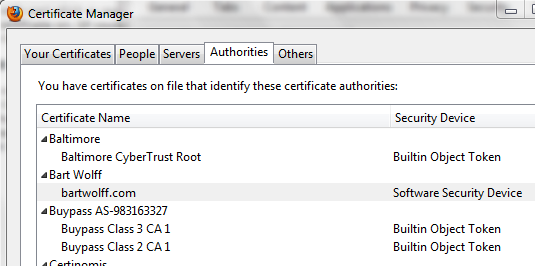
Of course, Windows is not the only place where it’s needed. Firefox, for example, has its own internal certificate store that it uses to validate certificates offered by websites it browses to. Here too I import the generated certificate as part of the trusted certificate authorities.
With this out of the way, any certificates I now sign with the root CA certificate will be automatically trusted.
Step 3: domain certificate creation
Next I created the domain certificate for my website. The procedure starts the same, with the creation of a new RSA key:
openssl genrsa -aes256 -out bartwolff.com.key 8192
However, in the next step I do not use the key to create a certificate, but instead I create a request for certificate creation:
openssl req -new -key bartwolff.com.key -out bartwolff.com.csr
I again need to input some information which will become part of the certificate. I input the following:
Country Name (2 letter code) [AU]:NL
State or Province Name (full name) [Some-State]:Netherlands
Locality Name (eg, city) []:Netherlands
Organization Name (eg, company) [Internet Widgits Pty Ltd]:Bart Wolff
Organizational Unit Name (eg, section) []:Certificate Authority
Common Name (eg, YOUR name) []:*.bartwolff.com
Email Address []:info@bartwolff.com
Now, the common name (CN) is of crucial importance: it determines the domain for which this certificate is valid. I entered *.bartwolff.com, which indicates a wildcard certificate. This certificate will be valid for all of my subdomains, like www.bartwolff.com and blog.bartwolff.com.
Now that the request has been created, it needs to be signed by another existing certificate, which in this case will be the root CA certificate I just created in the first step. Signing is done as follows:
openssl x509 -req -days 3650 -in bartwolff.com.csr -CA ca.crt -CAkey ca.key
	-set_serial 05 -out bartwolff.com.crt
The -set_serial 05 part is of some importance in that the serial number should be unique among certificates signed by this particular root CA certificate.
Finally, I still need to export the certificate along with its associated private key; otherwise it cannot be used to encrypt any data for use in the HTTPS protocol. I export into the PKCS12 format, which encrypts the keypair with a password:
openssl pkcs12 -export -out bartwolff.com.pfx
	-inkey bartwolff.com.key -in bartwolff.com.crt -certfile ca.crt
This keypair then gets imported in the certificate store on my server, where it will be used by IIS in the HTTPS protocol:

I import it in the Personal folder this time. Note the little key pictured on top of the certificate icon. This indicates a private key is present that belongs to this certificate. Note it was not there when I imported the root CA certificate.
Step 4: configuring IIS
The last step required to get everything working involves configuring the bindings for my sites in IIS to accept HTTPS requests. This is as simple as adding a new binding and selecting HTTPS:
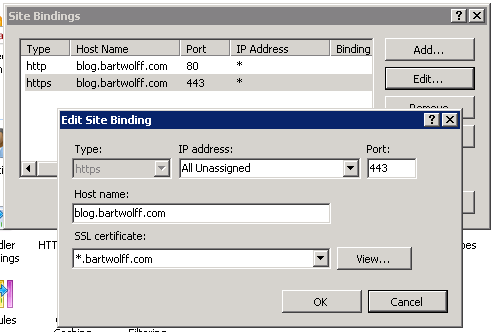
In the SSL certificate combobox the available certificates are listed. Because my certificate is a wildcard certificate, I also need to enter a host name. It also means I can have multiple HTTPS bindings using the same certificate. For my blog I enter blog.bartwolff.com and for my homepage (which runs on another site altogether in IIS) I enter www.bartwolff.com.
With this step completed, the work is done and my blog can be accessed over HTTPS. I’ve also followed these steps for enabling TLS 1.2 and switching the default cypher suites around to prefer stronger cyphers over “weaker” ones (AES-256 vs AES-128). However, this is entirely optional so I won’t go into details here.
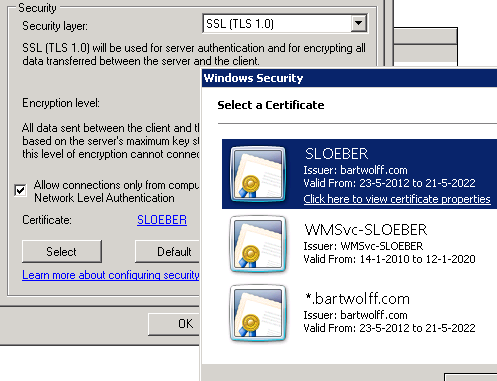
Step 5: configuring the RDP host
As a bonus step, here’s how to configure the RDP host to use a specified certificate to authenticate and secure its connection. Note the certificates in the Personal folder of my certificate store, pictured above. The SLOEBER certificate will be used by the RDP host. Note it’s signed by the same root CA certificate.
The process is rather simple. I open the Remote Desktop Session Host Configuration and open the properties of the RDP-Tcp connection (the only connection I have). Here, in the General tab, I can select the SLOEBER certificate:
That’s all there is to it!