If there’s one thing Windows Server sorely lacks, it’s a decent secure shell. There is no built-in SSH server, and any third-party solutions are either unmaintained or costly. I like neither. Fortunately, PowerShell itself actually has the ability of opening sessions on remote PCs, using WinRM. It just requires a bit of configuring first. In this post, I’ll discuss the steps I’ve had to take to enable PowerShell remoting on my server. For all steps, assume PowerShell is running with Administrator privileges.
Part 1: basic connectivity
In this part we’ll get a connection up between client (my laptop) and server (Sloeber). Lucky for us, PowerShell has a built-in cmdlet that does most of the setup for you (configuring and starting WinRM, and adding a rule to the Windows firewall):
Enable-PSRemoting -Force
We need to run this command on both client and server. I’m told the client part is necessary because the PCs are not in a domain. We also need to add both client and server to each other’s trusted host list. On the client we run:
Set-Item wsman:\localhost\client\trustedhosts Sloeber
…and on the server we run:
Set-Item wsman:\localhost\client\trustedhosts Satellite
We then restart the WinRM service on both machines:
Restart-Service WinRM
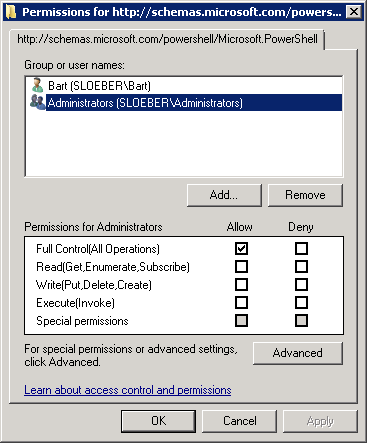
Next, we need to configure which users can perform remoting tasks. By default only administrators are allowed access, but I want to be able to log in with my regular user account as well. Of course, this is possible but requires some more configuration. On the server, we run the following command:
Set-PSSessionConfiguration -Name Microsoft.PowerShell -ShowSecurityDescriptorUI -Force
This opens the following dialog box, where we can set the appropriate permissions:
And that should be all! We can now connect to the server by opening a PowerShell session on the client:
Windows PowerShell
Copyright (C) 2009 Microsoft Corporation. All rights reserved.

PS C:\> Enter-PSSession -ComputerName Sloeber -Credential Sloeber\Bart
[sloeber]: PS C:\Users\Bart\Documents> ls

    Directory: C:\Users\Bart\Documents

Mode                LastWriteTime     Length Name
----                -------------     ------ ----
d----          2-5-2012     11:05            Network Monitor 3
d----         11-3-2012     15:19            SQL Server Management Studio
d----         16-1-2010     11:53            Visual Studio 2005
d----         10-9-2010     21:31            Visual Studio 2008
-a---         23-5-2012     19:39      10413 bartwolff.com.pfx
-a---         23-5-2012     14:53       3845 ca.crt
-a---         14-1-2010     18:46         40 netwerksleutel.txt
-a---         23-5-2012     17:22      10405 sloeber.pfx
-a---         23-5-2012     19:07       2342 svn.crt

[sloeber]: PS C:\Users\Bart\Documents> exit
PS C:\>
Pretty neat. But we’re not done yet.
Part 2: securing the connection
The connection we’ve established above works over HTTP. I’ve read the authentication part is encrypted regardless, but it’s obviously better to have a nice HTTPS connection for the entire session. It’s supposed to be a secure shell, after all. The first thing we need is a certificate, one which is suitable for server authentication and valid for the host we’re going to be listening on. Luckily, I had some lying around. Great, now I won’t have to go through that mess again.
Moving on, on the server we dive right into the gritty mess that is WinRM management through PowerShell’s WSMan drive:
PS C:\> cd WSMan:\localhost\Listener
PS WSMan:\localhost\Listener> ls

   WSManConfig: Microsoft.WSMan.Management\WSMan::localhost\Listener

Name                      Type                 Keys
----                      ----                 ----
Listener_641507880        Container            {Address=*, Transport=HTTP}

PS WSMan:\localhost\Listener>
Here, we see the actual listener that the Enable-PSRemoting cmdlet from the first part created for us. It’s possible to keep it around side by side with an HTTPS listener, but seeing as I only plan to accept HTTPS connections, we might as well get rid of it:
PS WSMan:\localhost\Listener> Remove-Item .\Listener_641507880
We stick a new HTTPS listener in its place:
PS WSMan:\localhost\Listener> winrm create winrm/config/Listener?Address=*+Transport=HTTPS
		'@{Hostname="*.bartwolff.com";Port="5986";CertificateThumbprint="106514..."}'
ResourceCreated
    Address = http://schemas.xmlsoap.org/ws/2004/08/addressing/role/anonymous
    ReferenceParameters
        ResourceURI = http://schemas.microsoft.com/wbem/wsman/1/config/listener
        SelectorSet
            Selector: Address = *, Transport = HTTPS

PS WSMan:\localhost\Listener> Restart-Service WinRM
PS WSMan:\localhost\Listener>
The key parts to take note of are the transport mode, which is HTTPS; the hostname, which must exactly match the CN value of your certificate’s subject field; and the certificate thumbprint, which belongs to the certificate we’re using. We restart the WinRM service after completing this step.
The last step is simply opening port 5986 on the firewall (remember, the port for the HTTP listener was opened automatically by the Enable-PSRemoting cmdlet), and forwarding it on the router. And that’s it. We can now connect again, this time with SSL enabled and to the domain we just set up:
PS C:\> Enter-PSSession -UseSSL -ComputerName remote.bartwolff.com -Port 5986 -Credential Sloeber\Bart
[remote.bartwolff.com]: PS C:\Users\Bart\Documents>
There we go. Who said Windows Server didn’t have a secure shell?